
Chapter 8
Product 3D Animation Overview

What is product animation?
Product animation is a CGI video that puts a product in motion and lets people see how it really works. It shows the shape in a clean, direct way and makes the design choices easy to understand. It also draws attention to the key moments of use that influence how people judge the product.
The unique benefit of 3D production is that a 3D video is made in digital form. It lets the brand fine-tune every part of the scene and try creative choices that a live shoot cannot offer. With 3D product animation services, one can show one’s products in any setting, from any angle, and at any level of detail. Furthermore, 3D videos can showcase a new product before launch, demonstrate how it works, show assembly steps, or highlight design variations.
How Product 3D Animation Differs from Product Video
Product 3D animation reshapes how brands present their products. It turns complex ideas into clear motion and delivers visuals that a standard video shoot cannot match.
- 3D animation gives full control over lighting, camera moves, timing, and materials. A real video shoot depends on the studio and the gear you use, so the results change every time the setup changes. In contrast, product 3D animation delivers stable quality.
- 3D animation shows angles a real camera cannot reach. It can pull apart the product, reveal inner parts, and break down each step in a way that is easy to follow. This gives viewers a quick, clear understanding of how the product works. Here you can explore camera angles used in 3D animation.
- 3D product animation builds scenes that are impossible to film in real life. The product can rotate in open space, move through perfect backgrounds, or shift between environments in one smooth shot. A video shoot cannot create this range without costly effects and complex setups.
- 3D animation does not depend on a physical sample. It can be created as soon as the product design is approved, so the product can be shown months before production. A live shoot must wait until a finished sample exists.
- 3D animation is easy to update. If the product gets a new color or a small feature change, the 3D artist edits the product inside the existing animation. If the product gets a full redesign, the 3D visualizer replaces the old 3D model with the new one while keeping the same cameras and movements. A live shoot must be done again each time something changes.
- The workflow is simpler. A shoot requires a studio, a crew, equipment, props, and time for setup and teardown. Product 3D animation works using product data alone, so the team can build scenes, adjust details, and render updates without any physical logistics. This process streamlines the workflow and accelerates the release of new visuals.

Essential Visual Blocks in Product 3D Animation
Strong product animation uses key visual parts to make the message clear and to give the scene real impact. A 3D rendering company relies on these parts to show how a product works and what its design brings to the user. They guide the tone of the scene and keep the viewer focused on the message. The list below outlines the core building blocks that help create compelling, informative product 3D animations.
- Light Transitions. These are gradual shifts in brightness and direction that shape the mood of the scene. They reveal the form of the product with more depth and make each detail easier to read.
- Usage and Configuration Demonstration. This part of the animation walks the viewer through real use cases and shows how each feature is set up or adjusted. This approach helps the viewer understand how the product works in practice and why these functions matter.
- Assembly Sequence. This part of the animation shows the product coming together step by step and makes each connection between parts easy to see. It helps the viewer understand how the build process works from start to finish.
- Exploded View. This visual block pulls the components apart to reveal the internal layout and the logic behind the engineering. This way, the viewer sees how the product is organized inside and how each part fits into the whole.
- Design Variations. This part of the animation switches colors, materials, and finishes directly on the model. The viewer can see how each option shifts the product’s look while the scene stays consistent.
- Macro and Detail Shots. Close-up framing draws attention to textures, finishes, and small components that need precise visibility. Such camera shots let the viewer study features that would be lost at a wider distance.
- Lifestyle and Monochrome Scenes. Lifestyle scenes place the product in a simple, atmospheric environment, while monochrome scenes use a clean, neutral setup. Both approaches keep the model readable and add mood without distracting from the form.
The Main Types of 3D Product Animations
Below are the main types of 3D videos that brands rely on in their campaigns. Usually, 3D animations blend several formats to achieve a stronger impact. Look at how each type works and use these insights to shape the next video assets.
#1. CG Assembly Animation
This type of 3D animation divides the assembly process into simple, readable stages. The viewer sees the product grow from its basic components to the finished form, which makes the whole construction easy to follow. Assembly 3D video is a practical way to explain designs that rely on many interacting parts.
#2. Demo 3D Animation

This format presents the product with a focus on its core functions and the actions that matter most to the user. The viewer sees how key features operate through simple, direct motion. A 3D animation demo gives a clear sense of what the product offers without going into technical depth.
#3. How-to 3D Videos

These 3D videos show each step of the operation in a clear, linear order that removes guesswork. Viewers can see how to switch modes, adjust settings, or use specific functions without needing extra explanation. The format is practical because people can pause or replay steps as they learn the process.
#4. Detailed Animations

These animations bring the camera close to the product to show textures, materials, and fine craftsmanship with real clarity. Small components become visible in a way that wider shots cannot provide. This approach is useful when the value of the product lies in precision and finish.
#5. Story Animated Video

These videos frame the product inside a simple narrative that highlights its purpose and the experience it offers. The storyline supports the brand message and gives viewers an emotional point of entry. When you aim for the product to evoke emotions rather than just functionality, this approach proves effective.
#6. Installation CG Video
These animated 3D videos guide viewers through the setup in a clear, step by step flow. Customers see where parts go, how they connect, and which tools are needed. This way, installation 3D animation reduces setup errors and helps people complete the process with confidence.
#7. Exploded View 3D Animation

This type of animation pulls the product apart on screen so the internal layout is easy to see. Each component appears in its proper place, which helps viewers understand how the whole system fits together. It is a strong choice for showing complex builds without long technical text.
#8. 3D Animation for Design Variations

This type of animation presents one model in a range of colors, materials, and finishes so viewers can compare options at a glance. All variations appear under consistent lighting, which makes every difference clear. It offers a clean way to show a full range of design choices in one place.
#9. Promo 3D Video

This type of video shows the product in a polished, attractive scene without using direct sales language. Lighting, motion, and framing work together to create a strong first impression. A promo 3D animation is ideal when the goal is to communicate the product’s appeal before introducing its details.
Basic Product Animation Pipeline
Here is how a product animation is made. These are the usual stages of the project, and they can be adjusted to the client’s needs.
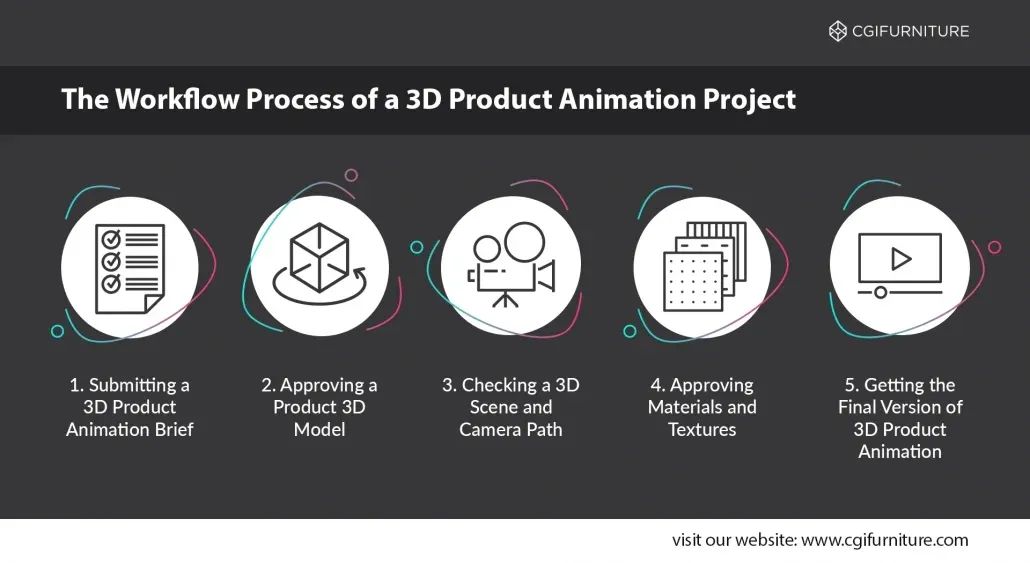
Stage 1: Brief
The process starts with a 3D animation brief. The client lists the features they want in the video and sends any storyboard they have already prepared. They also send the product references, images, links, technical notes, and the exact output formats for the final video. When all of this material is received, the team starts the production.
Stage 2: 3D Model and Scene Setup
The team builds the 3D model of the product and models the scene where it will be shown. This covers the environment, the surfaces the product interacts with, and the props needed in the scene. Both the product model and the scene layout go for approval to evaluate accuracy and confirm that the setup matches the brief. Once approved, they form the base for all further stages.
Stage 3: 3D Animation Preview
After that, the team prepares a preview of a future 3D video. They set camera paths, timing, and basic movement to show how the story will unfold. This preview video, also called “grab viewport”, lets the client approve the flow before materials and lighting are added.
Stage 4: Material and Lighting
The next step is materials and lighting setup. CGI artists assign surface textures, adjust reflections, and place lights to create the desired look. This stage defines the visual character of the final product 3D animation.
Stage 5: Final rendering and post-production
The production ends with the final 3D rendering and a few finishing touches. Frames are rendered at full quality, then enhanced with color correction, depth effects, and branding elements. This stage brings the 3D product animation to its final form. It is finished, ready for marketing use, and provided in the format requested.
The above description was a general overview of a typical 3D video production process. A more detailed breakdown with practical examples is available in this article 3D product animation stages.
What Post Production Can Enhance
What happens at the post production stage strongly influences the final result. Sure, nothing structural can be changed. Geometry, camera movement, and composition are already finalized. However, this stage makes a major difference in how the animation turns out. Post production gives the 3D animation its final atmosphere, elevates its visual appeal, and allows adding new elements.
Here are the central steps that shape the post production stage of a 3D animation.
#1. Artifact cleanup
This is the stage where small mistakes are fixed so nothing distracts from the product. Flicker, noise, or uneven edges get cleaned up. The result is a frame that looks stable and intentional.
#2. Adding people, décor, or additional elements
These elements are added to complete the scene and give the product a clear environment. People can appear as simple figures to show scale or presence in the space. Décor and props fill the background so the product sits in a setting that feels intentional rather than empty.
#3. VFX
Visual effects are added when the scene needs extra clarity or movement. It can be a small glow, a bit of smoke, drifting dust, or another cue that helps the viewer read the action. They are used when the product benefits from a clearer visual signal.
#4. Color Grading
Colors are adjusted so the product looks the same across all shots. This step sets the overall tone and makes sure the lighting and contrast stay steady from frame to frame.
#5. Lens and cinematic effects
This step adds optical effects that recreate how a lens behaves in real footage. Flare, motion blur, bokeh, and depth of field are applied to brighten highlights, soften fast motion, blur the background, or control focus. More examples with illustrations are available in the article cinematic visual effects in 3D animation.
#6. 2D overlays
These graphics are added to the post when the information is easier to show in a flat layer than to build in 3D. They can be labels, icons, simple diagrams, measurements, or a logo placed over the frame.
#7. Callouts
A callout shows exactly which part of the product you want to explain. A short label points to the sensor, button, or other feature in focus, so the viewer understands the detail right away. More details about product animation visual effects are available here product animation visual effects.

3D Product Animation Software
Studios choose 3D animation software based on how well it supports their work. For instance, character teams lean toward Maya because it handles rigging and deformation well. Motion graphics departments often rely on Cinema 4D because it connects easily with design workflows. Product and architectural studios used to favor 3ds Max. Many now switch to Maya or Houdini when they need stronger animation tools or a more unified pipeline.
Thereafter, the pipeline makes most of the decisions. Once a studio builds a render farm, gathers plugins, and sets up asset libraries, any new tool must fit into this structure without friction. Client expectations add another constraint. Each project comes with required formats and workflows that the 3D rendering studio's pipeline must comply with.
As a result, most CGI studios keep one primary 3D animation software and use a secondary tool only when a project needs it.
Industry Standard Tools for 3D Product Animation
Now let’s look closer at the most popular software choices for 3D animation projects. We will learn what the strengths of each solution are and how they support the 3D video production pipeline.
#1. 3ds Max
3ds Max is widely used in studios that work with architectural CGI, product CGI, and advertising videos. In architectural projects, 3ds Max is used to build interiors, furniture, and full room layouts quickly and with clean structure. It fits this type of work well, since the modeling tools handle straight lines, clear shapes, and detailed surfaces without much setup.
All of these workflows benefit from the wide range of plugins available for 3ds Max. This lets each studio shape the software to match its own pipeline and tools. Because of this flexibility, 3ds Max stays a dependable option for many types of CGI work.
For product animation, 3ds Max is often the main tool because it works well with manufactured objects. CGI Studios combine it with V Ray, Corona, or Redshift to shade and render their scenes. They bring in Maya or Houdini when a project needs advanced rigging or complex physics. Max stays central because it handles hard-surface models cleanly and works smoothly with other engines.
#2. Blender
Blender is an open source tool, and its low cost makes it a strong choice for small studios and indie teams. It includes features for modeling, shading, sculpting, and animation, so artists can cover most tasks inside one program.
In product animation studios, Blender is often the main tool for shots that need clean geometry and steady movement. Teams use it for device visuals, assembly steps, and simple mechanical motion where fast edits matter more than advanced rigging.
It works well with Cycles and Eevee, so studios can check materials and lighting fast. Larger teams may still use Maya or Houdini for complex setups or heavy simulation, but Blender covers most daily work.
#3. Maya
Maya is the standard in character driven production. It stands out by precise tools for rigging, skinning, and deformation, which keeps motion clean and predictable. This is why film studios and AAA game developers rely on it when they build complex facial systems or need full control over how a character moves. The program also supports large pipelines well, so teams can automate many steps without breaking the workflow.
For product animation studios, Maya is usually a secondary tool. They use it when a project needs parts to move in a very controlled way, like hinges, sliders, or linked pieces that must follow exact rules. It often works with tools like 3ds Max, Blender, or Houdini, which handle most of the modeling, materials, and final rendering.
#4. Cinema4D
C4D is excellent for short, polished animations that do not need complex setups. CGI studios choose it when they need fast and precise movement, like product spins, clean camera moves, or small graphic elements. It works well because the timeline is easy, the keyframing is fast, and it runs smoothly with Redshift and Octane. CGI Artists also send C4D renders to After Effects when they need to add labels, text, or icons.
For product animation studios, C4D is usually a secondary tool. They use it to add smooth supporting movement and clear visual accents that enhance the main 3D work. It fits well into pipelines built around Blender, 3ds Max, or Maya and adds extra speed to tasks that need clean, design focused motion.
#5. Houdini
Houdini helps studios handle shots that involve real physical behavior. 3D Animation teams use it when they need liquids to move naturally, powders to scatter, or pieces to break apart in a believable way. The setup stays flexible, so if the product shape or timing changes, the 3D artist tweaks the node chain instead of starting again.
3D animation studios also open Houdini when they need to show how a texture behaves in motion. For example, gels stretching, grains settling, or soft materials reacting to pressure. In these cases Houdini works as a secondary tool, used only for the complex scenes that the main 3D software cannot handle. These moments often appear in small portions of a project, while the rest relies on simple camera moves and clean product shots.
To learn more, refer to this article about product 3D animation software.
CPU vs GPU Rendering for Product Animation
Let’s start with terminology. A CPU is the main processor in a computer. It handles many different tasks and works through them in a steady, predictable way. A GPU is its own processor, built to deal with images and other visual tasks. It works on lots of small operations at once, so it can render much faster than a CPU.
The Difference between CPU and GPU Rendering
CPU rendering moves through the scene step by step. It checks lights, shadows, and materials in a careful, linear process. This slower pace makes it stable when a scene is large or full of detailed objects.
GPU rendering works in parallel. It breaks the image into many small tasks and works on them at once, so the result comes much faster. Modern engines such as Redshift, Octane, Cycles X, and V Ray GPU push this even further and keep the quality high.
Because of these differences, 3D animation studios use each option for different needs. CPUs offer steady performance for heavy or complex scenes. GPUs give quick results and faster revisions, which helps keep production moving. Most pipelines rely on both, depending on the project and the stage.
Why Brands Use Product Animation
Brands choose product animation when they need clear communication, flexible production, and results that support sales and engagement. Here are the core reasons behind this choice.

#1. Clear Function Breakdown
3D animation makes complex features feel simple. It shows the product in a way that filming cannot, revealing the parts that work behind the scenes. This kind of view helps buyers follow the idea with ease and understand how the product delivers its value. It gives them clarity fast and supports a confident choice.
#2. Pre-launch Sales Readiness
3D product animation lets brands present a finished concept before any physical unit exists. Marketers can use a full motion sequence in landing pages, sales decks, and pre-launch ads while production is still underway. This supports launch planning because the team sees the full use flow, not a single frame. They understand how each part moves and how every feature works. This helps brands write product texts, plan demos, and prepare sales scripts that match real use. The 3D animation also gives a clear view of each planned function. Such an approach lets the team create launch content and confirm the feature list without waiting for a prototype.
#3. Higher Conversions on Product Detail Pages
3D product videos help buyers make a faster choice on PDP pages. The format reduces hesitation by showing the product in real use instead of asking buyers to imagine how it works. Smooth, controlled shots highlight each benefit and keep the focus on what matters. 3D animation also replaces long text with clear visual proof, so buyers get the clarity they need and move closer to the Add to Cart moment.
#4. Higher Engagement
3D animation for social media stands out next to static posts because movement grabs attention fast. Short loops keep viewers on the post a little longer, which gives the brand time to show a clear benefit. The motion also shows how the product works even with the sound off, so people understand the value right away and respond more often. Most importantly, strong engagement on social media requires posting many videos and testing them fast. So 3D animation technology helps produce a steady stream of fresh content. It allows flexible scenes, fast edits, and reusable assets that keep brand channels active without constant reshoots. This way, marketers can get amazing 3D product animation reels, stories, feed videos, ads, and more.
#5. Scalable Video Production
3D animation scales video content because it removes the limits of filming. Once a team builds a 3D model, they can reuse it for many versions and updates, so new clips do not require another shoot. This keeps production fast, because teams do not spend time searching for locations, waiting for daylight, or setting up lights. Everything happens inside the software, which keeps the process steady and predictable. As a result, marketers can make new clips for every channel and keep their schedule on track.

3D Product Animation Pricing
There are two criteria that influence the price of a product 3D animation the most. The first one is the length of the 3D clip, since most studios charge by the second and build the base cost around the final runtime. The second one is the 3D model of the product. If the model is ready, production moves faster and costs less. If the model needs upgrades to reach the right quality, the price is still lower than creating a new model from scratch.
There are a number of additional factors that affect the price of a 3D product animation in addition to these two fundamental ones. They shape the scope of work, the time it takes to produce the clip, and the final budget. Here are the key points below.
#1. Product complexity
A product with many parts, materials, or internal elements takes more time to model and animate.
#2. Movement type
A basic spin is quick because the motion is simple. When parts move, connect, or react to force, the work takes longer. Each action must be built by hand, which adds time to the project.
#3. Detail level
High resolution textures, micro details, and close up shots add cost because the artist must build much finer shapes for everything that appears in the frame. Close views expose every small surface, so the 3D animation team spends more time refining the model. These shots also extend render time.
#4. Number of scenes
Each 3D scene needs its own lighting, camera setup, and object layout. These elements must be built again for every new scene because the angles, distances, and shadows change. None of this setup can be copied, as it was in the previous scene.
#5. Rendering quality
Full HD is the default option we work with. Higher realism requires longer render times and more setup, which increases the 3D product animation price.
#6. Adding people
Adding people raises the workload. A 3D human needs a body setup, clothing, and motion that looks natural in the shot. AI-generated people skip some steps, but the team still needs to refine the image, place it in the scene, and match the lighting to ensure it looks realistic.
#7. Post production
After the frames are rendered, the team shapes the final look of the video. This stage covers titles, logos, sound, and simple graphic moves. Each item needs its own setup, and they all must work together with the footage. The more elements involved, the longer this last stage takes.
Now it is clear how 3D product animation works and where it brings the most value. This makes it easier to choose the format that fits the product and explain the idea to the studio. With clear direction, the team can produce a video that highlights the right features and supports the launch plan.
Conclusion
Product 3D animation is a functional tool, not a decorative one. It helps brands explain how a product works, prepare marketing materials before production, and keep visual output consistent across channels.
Because the process is fully digital, teams get control and flexibility. One 3D model can be reused for product pages, demos, ads, and social media, with updates made quickly and without reshooting. This keeps production predictable and supports faster launches.
When integrated into the workflow, 3D product animation simplifies communication between design, marketing, and sales. It replaces long explanations with clear motion and helps customers understand the product faster, which directly supports stronger engagement and better decisions.
Get the Commercial CGI & Product Rendering Guide for Marketing Directors
Everything you need to scale product content with CGI.
Get expert insights, real project examples, and strategies with proven ROI.
Fill out the form to receive the guide directly in your inbox.